Introduction
The Internet of Things (IoT) has transformed the way embedded systems interact with the digital world. From smart home automation and wearable devices to industrial monitoring and wireless sensor networks, microcontrollers with built-in wireless connectivity have become essential for modern embedded development. Among these, the ESP32 from Espressif Systems has emerged as one of the most popular choices due to its powerful hardware, integrated Wi-Fi and Bluetooth capabilities, low cost, and extensive software ecosystem.
To simplify application development, Espressif provides the Espressif IDE, an Eclipse-based Integrated Development Environment built around the ESP-IDF (Espressif IoT Development Framework). This IDE streamlines project creation, code development, compilation, flashing, and debugging, making it suitable for both beginners and professional embedded developers.
This article introduces the ESP32 platform, explains its major features and applications, demonstrates how to install and configure the Espressif IDE, and guides readers through creating their first ESP32 project.
1. Introduction to ESP32
What is ESP32?
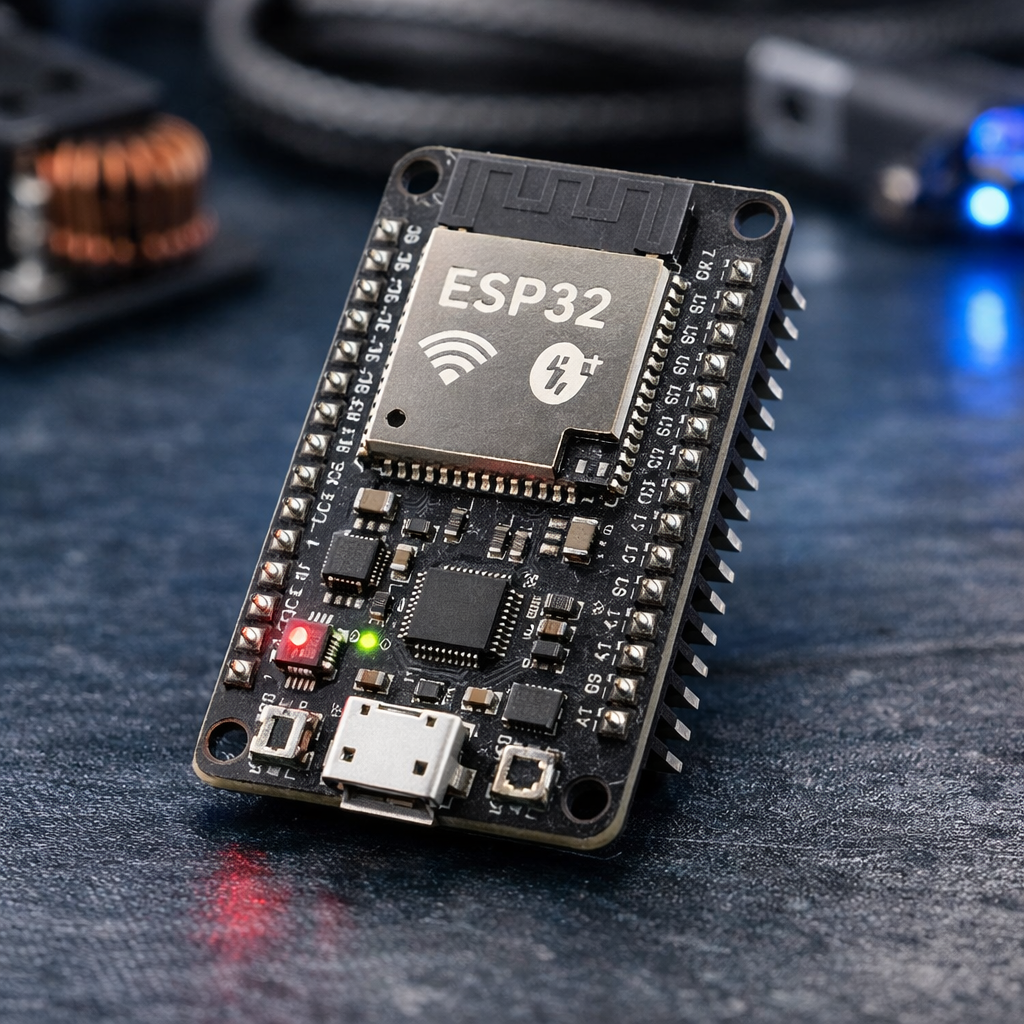
The ESP32 is a low-cost, low-power microcontroller chip developed by Espressif Systems, widely used in IoT (Internet of Things) applications. It features integrated Wi-Fi and Bluetooth connectivity, making it ideal for wireless communication projects. Built around a dual-core Tensilica LX6/LX7 processor, it offers high performance while maintaining energy efficiency, and includes a rich set of peripherals such as ADCs, DACs, UART, SPI, I²C, and PWM. Its versatility allows developers to use it for smart home devices, wearable electronics, robotics, and industrial automation, with strong support from open-source frameworks like Arduino and ESP-IDF.
Unlike traditional microcontrollers that require external communication modules, the ESP32 integrates Wi-Fi and Bluetooth directly into the chip, reducing both hardware complexity and development cost.
| ESP32 Variant | CPU Core | Cores | Frequency |
|---|---|---|---|
| ESP32 (Classic, 2016) | Xtensa LX6 | Dual-core / Single-core | Up to 240 MHz |
| ESP32-S2 (2020) | Xtensa LX7 | Single-core | Up to 240 MHz |
| ESP32-S3 (2020) | Xtensa LX7 | Dual-core | Up to 240 MHz |
| ESP32-C3 | RISC-V | Single-core | 160 MHz |
| ESP32-P4 (latest, high-performance) | Dual-core RISC-V | 400 MHz | Multimedia/AI focus |
The ESP32 is supported by multiple software development environments including:
- ESP-IDF (Official Development Framework)
- Arduino IDE
- PlatformIO
- MicroPython
- Espressif IDE
For professional embedded software development, ESP-IDF together with Espressif IDE is the recommended solution.
2. Key Features of ESP32
The popularity of ESP32 comes from its rich feature set that combines high processing capability with versatile connectivity.
2.1 Dual-Core Processor
Most ESP32 variants feature:
- Dual-core Xtensa LX6/LX7 processor
- Clock speed up to 240 MHz
- Efficient multitasking using FreeRTOS
The dual-core architecture allows developers to dedicate one core to communication tasks while using the other for application logic.
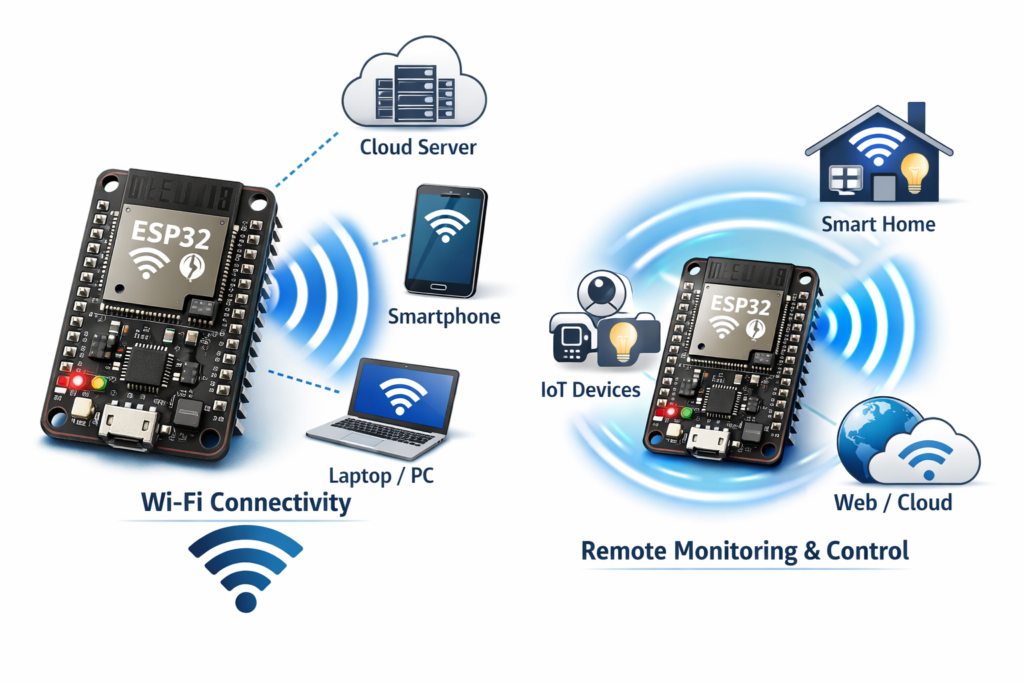
2.2 Built-in Wi-Fi
ESP32 supports IEEE 802.11 b/g/n Wi-Fi standards.
Capabilities include:
- Station Mode (STA)
- Access Point Mode (AP)
- Simultaneous AP + STA mode
- TCP/IP networking
- HTTP Server
- MQTT Client
- HTTPS
- OTA (Over-The-Air) firmware updates
n the context of the ESP32, Wi‑Fi is one of its most powerful built‑in features, enabling seamless wireless communication without needing external modules. The ESP32 includes an integrated 802.11 b/g/n transceiver that supports both Station (STA) and Access Point (AP) modes, meaning it can connect to existing networks or create its own hotspot. It also supports Wi‑Fi Direct for peer‑to‑peer connections and soft‑AP + STA simultaneous operation, allowing it to act as a bridge between devices and networks. Developers can use libraries like WiFi.h in Arduino or the ESP‑IDF Wi‑Fi stack to manage connections, send HTTP requests, or host web servers. This makes the ESP32 ideal for IoT applications such as smart home automation, remote monitoring, and data logging, where devices need to communicate wirelessly with cloud services or mobile apps.
2.3 Bluetooth Connectivity
ESP32 supports:
- Bluetooth Classic
- Bluetooth Low Energy (BLE)
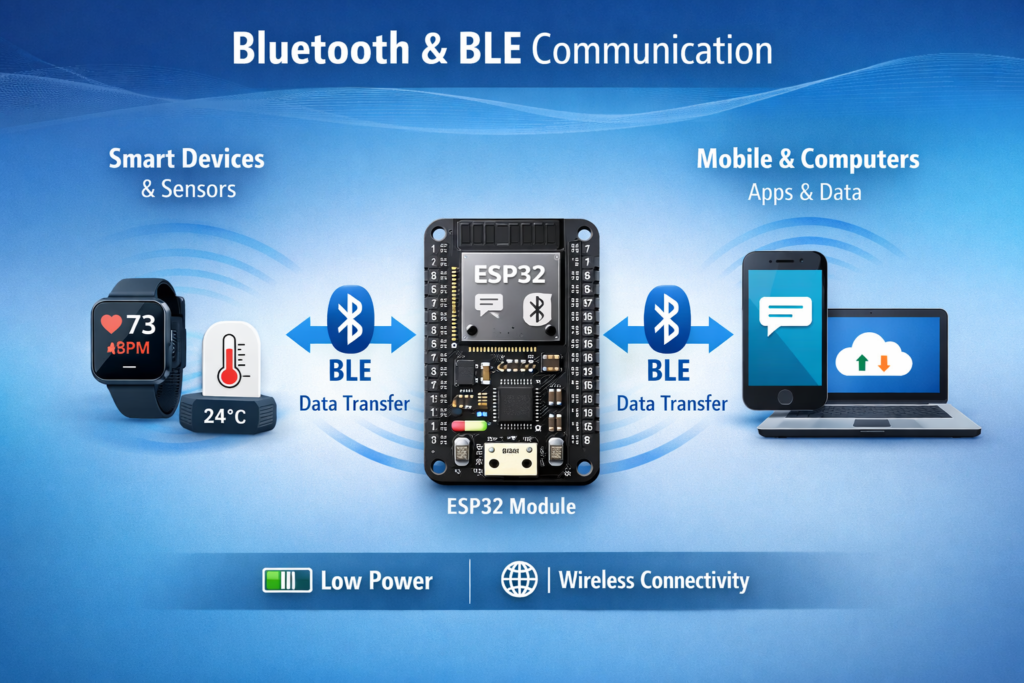
In the ESP32, Bluetooth and BLE (Bluetooth Low Energy) provide flexible wireless communication options alongside Wi‑Fi. The chip supports Classic Bluetooth, used for streaming data or connecting to devices like speakers and smartphones, and BLE, designed for low‑power, short‑range communication with sensors, wearables, and IoT gadgets. BLE is particularly efficient because it transmits small packets of data intermittently, conserving battery life — ideal for applications like fitness trackers or smart home sensors. Using the Arduino BluetoothSerial library or the ESP‑IDF Bluetooth stack, developers can implement features such as device pairing, data exchange, and beacon broadcasting. This dual Bluetooth capability makes the ESP32 a versatile platform for projects that require both high‑speed data transfer and energy‑efficient connectivity.
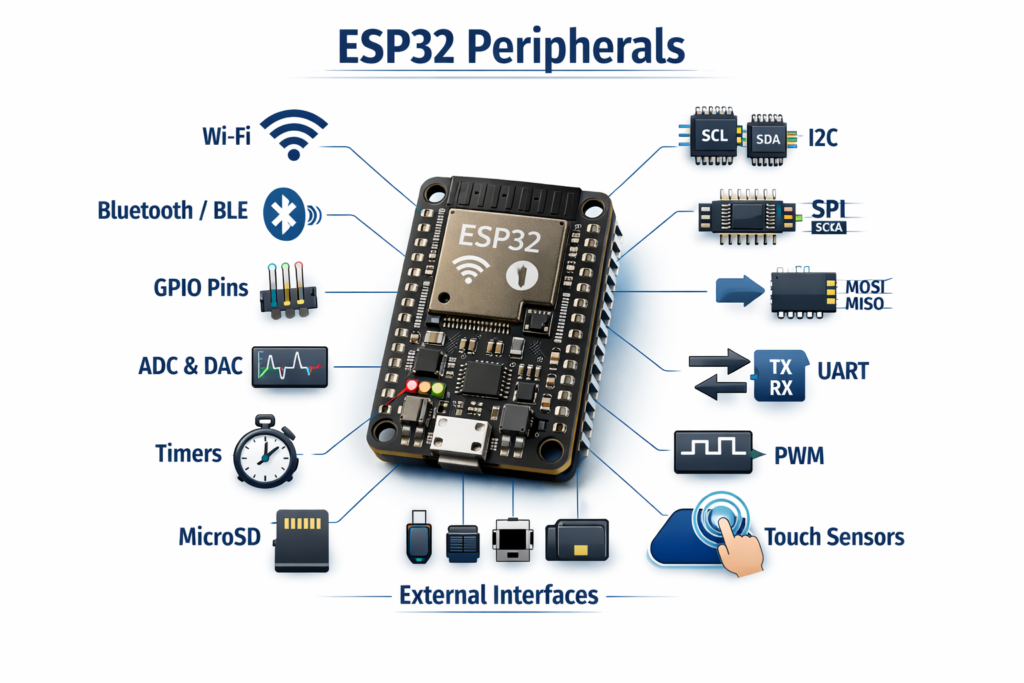
2.4 Rich Peripheral Interfaces
ESP32 includes numerous communication peripherals:
Digital Interfaces
- GPIO (General Purpose I/O): Flexible pins for digital input/output, controlling LEDs, buttons, and sensors.
- UART (Universal Asynchronous Receiver/Transmitter): Serial communication for debugging or connecting modules like GPS.
- SPI (Serial Peripheral Interface): High‑speed bus for displays, memory chips, and sensors.
- I²C (Inter‑Integrated Circuit): Two‑wire bus for multiple peripherals like sensors and RTCs.
- I²S (Integrated Interchip Sound): Audio interface for microphones, DACs, and codecs.
- CAN (TWAI): Controller Area Network support for automotive and industrial communication.
Analog Interfaces
- ADC (Analog‑to‑Digital Converter): Converts analog signals (e.g., sensor voltages) into digital values.
- DAC (Digital‑to‑Analog Converter): Outputs analog signals, useful for audio or waveform generation.
- Hall Effect Sensor: Built‑in sensor to detect magnetic fields.
- Touch Sensors: Capacitive touch inputs for buttons or sliders without mechanical switches.
Timing
- PWM (Pulse Width Modulation): Generates variable duty cycle signals for motor control, dimming LEDs, or audio.
- Hardware Timers: Precise timing operations independent of CPU load.
- Watchdog Timers: Safety feature that resets the system if software hangs or crashes.
2.5 Low Power Operation
ESP32 supports multiple power-saving modes:
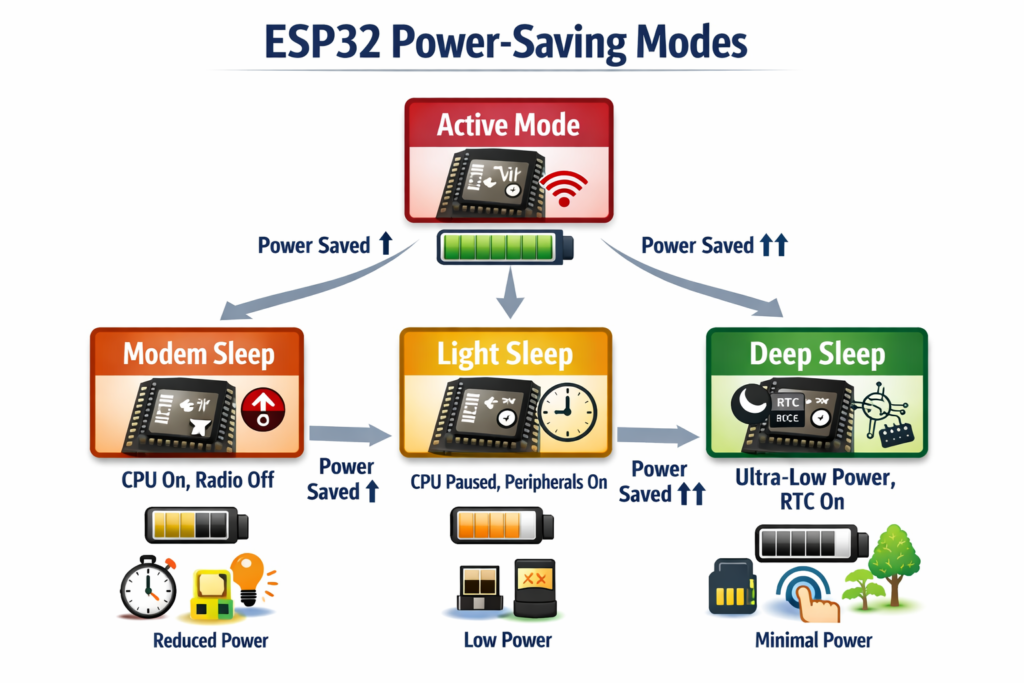
- Active Mode: CPU and radios (Wi‑Fi/Bluetooth) are fully powered, running tasks at maximum performance.
- Modem Sleep: CPU remains active, but Wi‑Fi/Bluetooth radios are turned off when not needed, saving energy.
- Light Sleep: CPU pauses execution, peripherals remain partially active, and the system can quickly wake up on interrupts.
- Deep Sleep: Most of the chip is powered down, only RTC memory and certain wake‑up sources remain active. Ideal for battery‑powered devices, enabling operation for months or even years depending on the application.
The ESP32 offers multiple power-saving modes, from full performance in Active Mode to ultra-low consumption in Deep Sleep. This flexibility allows developers to balance energy efficiency with functionality, enabling battery-powered IoT devices to run for months or even years.
2.6 Security Features
ESP32 includes hardware security mechanisms such as:
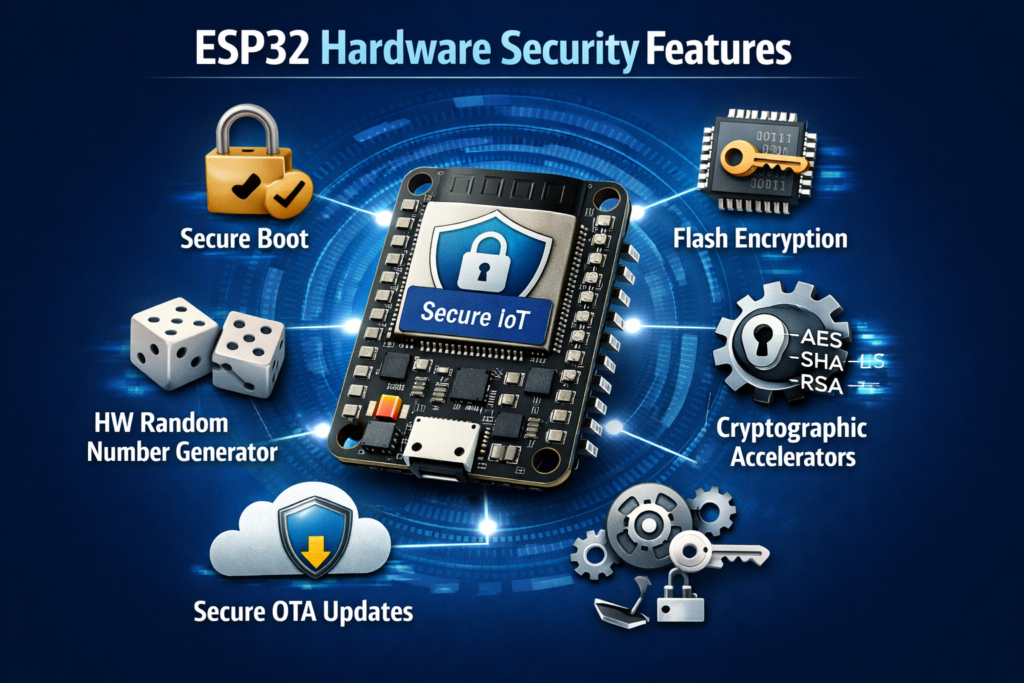
- Secure Boot: Ensures only verified firmware runs on the device by checking digital signatures during startup.
- Flash Encryption: Encrypts data stored in flash memory, protecting sensitive information from unauthorized access.
- Hardware Random Number Generator (RNG): Generates true random numbers for cryptographic operations, improving security strength.
- Cryptographic Accelerators: Dedicated hardware blocks for AES, SHA, RSA, and ECC algorithms, enabling fast and efficient encryption/decryption.
- Secure OTA Updates: Verifies firmware integrity and authenticity during over‑the‑air updates to prevent tampering.
ESP32 integrates robust hardware security features that safeguard data, firmware, and communication — making it a trusted choice for secure IoT deployments.
3. Applications of ESP32
The versatility of ESP32 makes it suitable for numerous embedded applications.
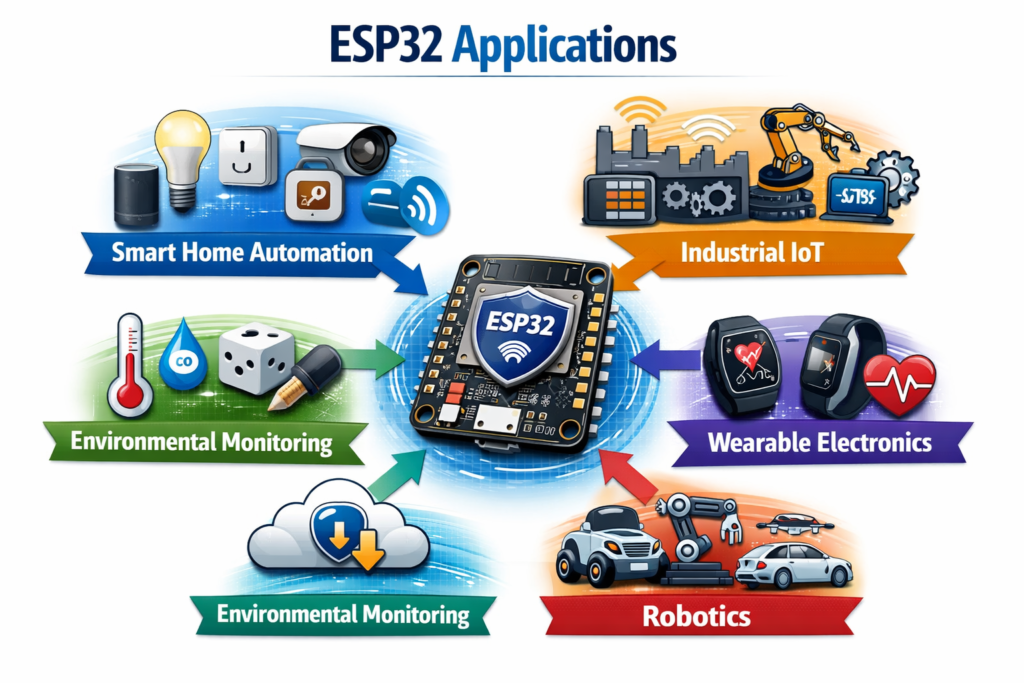
Smart Home Automation
The ESP32 plays a central role in smart home automation, thanks to its built‑in Wi‑Fi and Bluetooth capabilities that enable seamless connectivity and control. It powers devices such as smart lighting, switches, and plugs, allowing users to automate routines, adjust brightness, or schedule power usage remotely. In home security, ESP32 can manage sensors, cameras, and alarms, sending real‑time alerts to smartphones. Its support for voice‑controlled appliances integrates easily with assistants like Alexa or Google Home, enabling hands‑free operation. Compact, energy‑efficient, and versatile, the ESP32 serves as the backbone of modern connected homes, combining convenience, efficiency, and security in one platform.
Industrial IoT
In Industrial IoT (IIoT), the ESP32 serves as a powerful and cost‑effective platform for connecting machines, sensors, and control systems to the cloud. It enables machine monitoring by collecting real‑time operational data, helping detect anomalies early. Through predictive maintenance, the ESP32 analyzes sensor feedback to anticipate equipment failures and reduce downtime. Its support for wireless sensor networks allows multiple nodes to communicate efficiently across large industrial setups. Acting as industrial gateways, ESP32 devices aggregate and transmit data securely to servers or dashboards. Combined with data logging capabilities, these features make the ESP32 ideal for smart factories and automation systems that demand reliability, scalability, and energy efficiency.
Environmental Monitoring
For Environmental Monitoring, the ESP32 is an excellent choice because it can interface with a wide range of sensors to measure temperature, humidity, air quality, soil moisture, and atmospheric pressure. Its built‑in Wi‑Fi allows this data to be transmitted directly to cloud platforms for real‑time analysis and visualization, enabling applications such as smart agriculture, weather stations, and pollution tracking. Compact, low‑power, and versatile, the ESP32 makes it easy to build connected monitoring systems that provide valuable insights into environmental conditions while remaining cost‑effective and scalable
Wearable Electronics
Because of its BLE capability and low‑power modes, the ESP32 is an excellent choice for wearable electronics. It enables smart watches to sync data wirelessly with smartphones, supports health monitoring devices that track vital signs in real time, and powers fitness trackers that log activity while conserving battery life. In medical contexts, ESP32 is used for patient monitoring, transmitting data securely to healthcare systems. Its combination of energy efficiency, compact size, and robust connectivity makes it a versatile platform for developing next‑generation wearable solutions that balance performance with long battery life.
Robotics
In Robotics, the ESP32 enables versatile wireless control through Wi‑Fi, Bluetooth, web interfaces, and mobile applications, making it a powerful platform for modern robotic systems. It is widely used in mobile robots for navigation and remote operation, robotic arms for precise industrial tasks, drone controllers for aerial applications, and even autonomous vehicles where real‑time communication and decision‑making are critical. With its dual connectivity options, low‑power modes, and ability to host web servers or mobile app integrations, the ESP32 provides a compact yet robust solution for building intelligent, connected robots across hobbyist, educational, and industrial domains.
Smart Agriculture
For Smart Agriculture, the ESP32 is widely adopted because of its ability to connect sensors and actuators over Wi‑Fi or Bluetooth, enabling automation and real‑time monitoring. It powers automatic irrigation systems by measuring soil moisture and controlling water pumps, supports soil monitoring for nutrient and moisture levels, and drives weather stations that track temperature, humidity, and atmospheric conditions. In livestock management, ESP32 can monitor animal health and location, while in greenhouse automation it regulates lighting, ventilation, and climate to optimize crop growth. Compact, energy‑efficient, and versatile, the ESP32 provides farmers with a cost‑effective way to build smart, connected agricultural solutions that improve productivity and sustainability.
4. Introduction to Espressif IDE
Espressif IDE is the official Eclipse‑based development environment designed specifically for working with the ESP‑IDF (Espressif IoT Development Framework). It provides an all‑in‑one platform that integrates essential tools for writing code, managing projects, compiling applications, flashing firmware, debugging programs, and monitoring serial output — all within a single interface. This streamlined setup eliminates the need for manual configuration, making ESP‑IDF development more efficient and beginner‑friendly.
Before installing Espressif IDE, ensure you have the necessary hardware — an ESP32 development board, a USB cable, and a Windows, Linux, or macOS computer. On the software side, you’ll need an internet connection, administrator privileges, and USB drivers (if required). Together, these prerequisites prepare your system for a smooth installation and development experience with Espressif IDE.
5. Installing Espressif IDE
Espressif IDE streamlines ESP‑IDF development by combining Eclipse CDT with Espressif’s Installation Manager, offering a complete environment for coding, flashing, debugging, and monitoring ESP32 projects across Windows, Linux, and macOS.
Step 1: Download Espressif IDE
- Go to the Espressif official website and download the latest IDE package for your operating system.
- Supported OS: Windows, Linux, macOS.
- Windows users: Espressif provides an offline installer that bundles ESP‑IDF and tools.
- Linux/macOS users: Download the IDE package and install ESP‑IDF separately via EIM.
Step 2: Install the IDE
- Run the installer and follow the wizard.
- The installer sets up the Eclipse CDT platform with Espressif plugins.
- Prerequisites: Ensure Java, Python(3 or more), and Git are installed and available in your system path.(For windows users make sure you create aliases for python3 as all commands run with python3 command instead of python or py command. Make sure you take care of it.)
- Unlike older versions, the IDE no longer manages ESP‑IDF internally — it now uses Espressif Installation Manager (EIM) for toolchains, Python environment, and build tools.
Step 3: Launch Espressif IDE
For new updates usually for windows user a portable .zip for application is provided which you can use. Follow this link for more details. https://docs.espressif.com/projects/espressif-ide/en/latest/downloads.html
- Open the IDE after installation. you can use the earlier version of installer. https://dl.espressif.com/dl/esp-idf/
- On first launch, select a workspace location
- The workspace stores all your projects, settings, and configurations.
Step 4: Configure ESP‑IDF
- Navigate to Espressif > ESP‑IDF Manager inside the IDE.
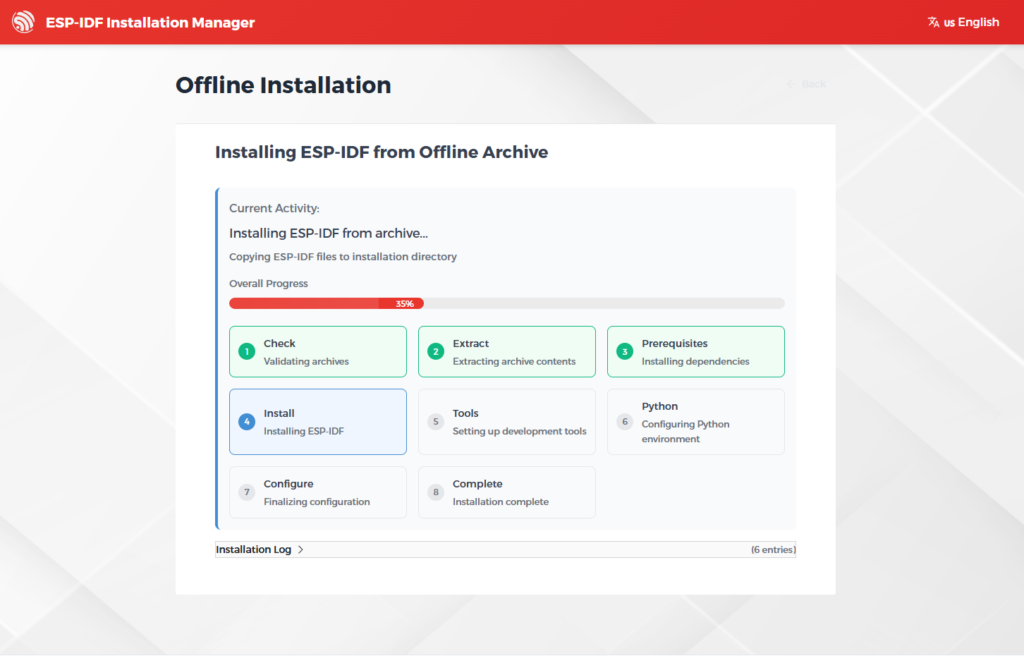
- If EIM is not installed, click Download & Launch EIM.
- Use EIM to:
- Install or update ESP‑IDF versions.
- Download required toolchains.
- Install Python packages.
- The IDE validates the environment automatically.
You can manage multiple ESP‑IDF versions but only one can be active at a time.
After successful setup, the IDE is fully ready for development, allowing you to write, compile, flash, and debug ESP32 applications seamlessly within one integrated environment.
6. Explaining Hardware we use
Seeed Studio XIAO ESP32C6
Seeed Studio XIAO ESP32C6 is powered by the highly-integrated ESP32-C6 SoC, built on two 32-bit RISC-V processors, with a high-performance (HP) processor with running up to 160 MHz, and a low-power (LP) 32-bit RISC-V processor, which can be clocked up to 20 MHz. There are 512KB SRAM and 4 MB Flash on the chip, allowing for more programming space, and binging more possibilities to the IoT control scenarios.
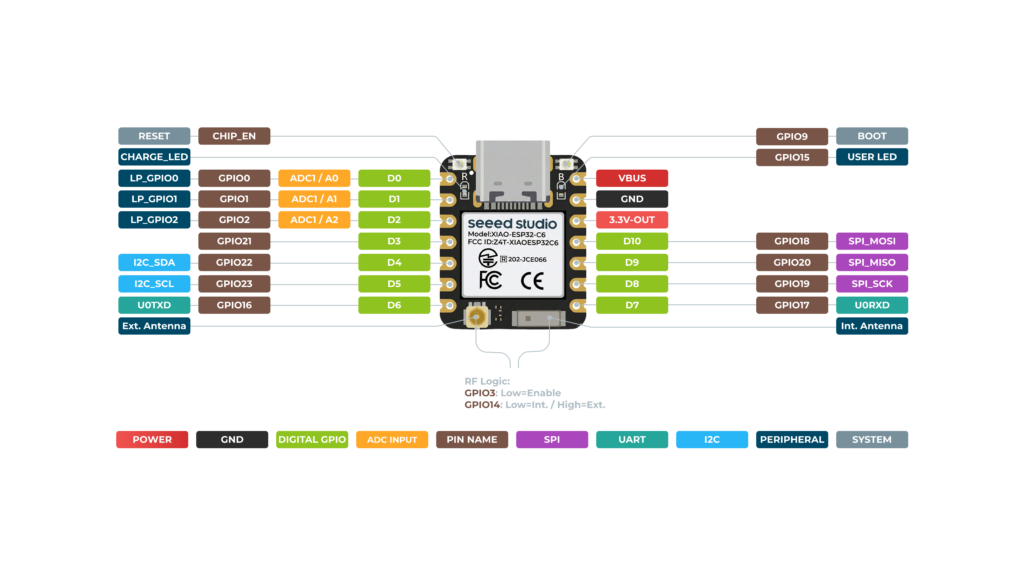
XIAO ESP32C6 is Matter native thanks to its enhanced wireless connectivity. The wireless stack supports 2.4 GHz WiFi 6, Bluetooth® 5.3, Zigbee, and Thread (802.15.4). As the first XIAO member compatible with Thread, it’s a perfect fit for building Matter-compliant projects, thus achieving interoperability in smart-home.
Features
- Enhanced Connectivity: Integrates 2.4 GHz Wi-Fi 6 (802.11ax), Bluetooth 5(LE), and IEEE 802.15.4 radio connectivity, allowing for the application of Thread and Zigbee protocols.
- Matter Native: Supports the building of Matter-compliant smart home projects, ensuring interoperability among different smart devices.
- Security Encrypted on Chip: Utilizes the ESP32-C6 to provide secure boot, encryption, and Trusted Execution Environment (TEE) features, enhancing the security of smart home projects.
- Outstanding RF Performance: Features an on-board antenna with up to 80m BLE/Wi-Fi range and offers an interface for connecting an external UFL antenna, ensuring reliable connectivity.
- Leveraging Power Consumption: Offers four working modes, including a deep sleep mode with consumption as low as 15 μA, along with support for lithium battery charge management.
- Dual RISC-V Processors: Incorporates two 32-bit RISC-V processors, with the high-performance processor capable of running up to 160 MHz and the low-power processor up to 20 MHz.
- Classic XIAO Designs: Maintains the thumb-size form factor of 21 x 17.8mm and single-sided mount design, ideal for space-limited projects like wearable devices.
7. Understanding the Espressif IDE Interface
When you launch Espressif IDE, the workspace is organized into several key sections:
- Project Explorer Displays the project structure, including source files, header files, build configuration, and CMake scripts. This is where you navigate between different parts of your ESP‑IDF project.
- Editor Window Used for writing C/C++ code with features like syntax highlighting, auto‑completion, and code navigation. It provides a modern coding experience similar to other Eclipse‑based IDEs.
- Console Shows compilation logs, build errors, and flash progress. This section is critical for debugging build issues and confirming successful firmware uploads.
- Problems View Lists syntax errors, missing files, and warnings detected during compilation. It helps developers quickly identify and fix issues.
- Serial Monitor Displays runtime messages printed by the ESP32 via UART. For example:
Hello ESP32!
Temperature = 28.5 C
WiFi Connected
This confirms that your program is running and communicating correctly.
8. Creating Your First ESP32 Project
Espressif IDE makes project creation straightforward:
Step 1: Create New Project Navigate to: File → New → Espressif IDF Project.
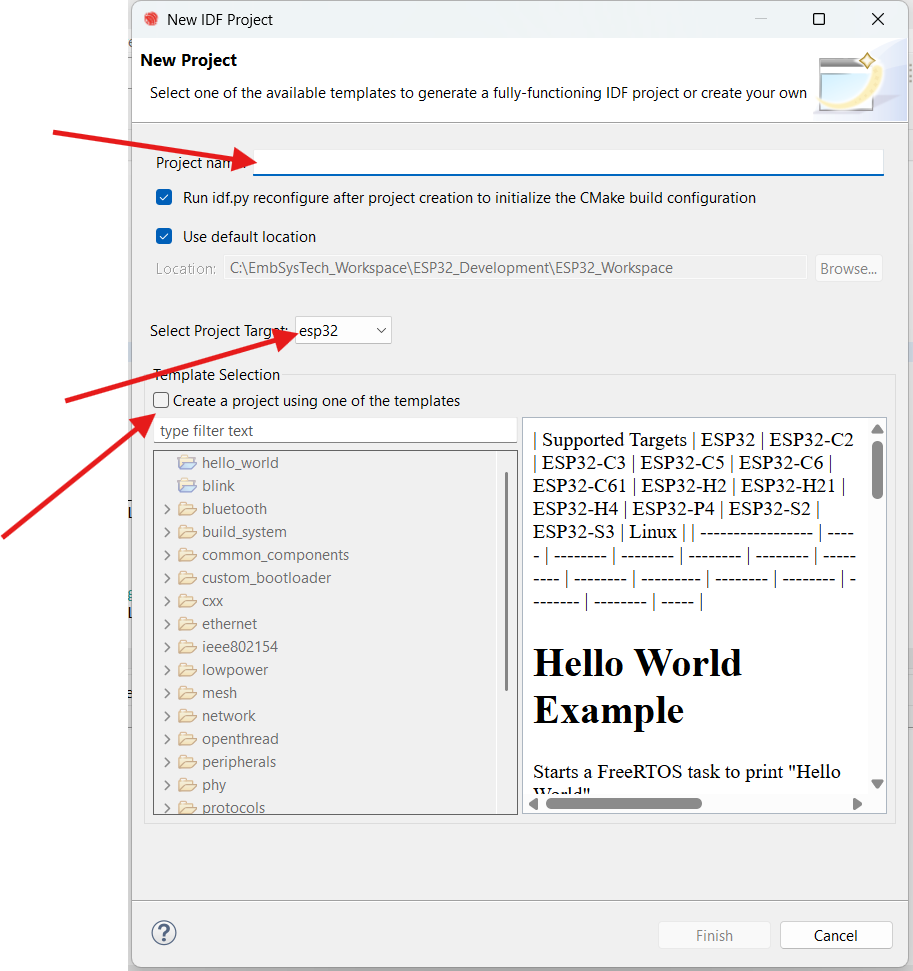
Step 2: Project Configuration
- Enter a Project Name (e.g.,
Blink_LED) - Select your ESP32 target chip(ESP32-C6 for our example)
- Choose the ESP‑IDF version(latest)
- Define the project location Click Finish to generate the project.
Step 3: Project Structure A typical ESP‑IDF project looks like this:
Blink_LED
│
├── main
│   ├── CMakeLists.txt
│   └── main.c
│
├── CMakeLists.txt
│
├── sdkconfig
│
└── build- main/ → contains application source files
- main.c → entry point of the application
- sdkconfig → stores project configuration settings
- build/ → contains compiled binaries
9. Writing the First Program
Check following code:
#include <stdio.h>
#include "freertos/FreeRTOS.h"
#include "freertos/task.h"
#include <stdbool.h>
#include <unistd.h>
#include "driver/gpio.h"
#include "esp_log.h"

#define BLINK_GPIO 15
#define CONFIG_BLINK_PERIOD 500

static const char *TAG = "Blinky";
static uint8_t s_led_state = 0;

void app_main(void)
{
	gpio_reset_pin(BLINK_GPIO);
	gpio_set_direction(BLINK_GPIO, GPIO_MODE_OUTPUT);

    while (true)
	{
		ESP_LOGI(TAG, "Turning the LED %s!\n", s_led_state == true ? "ON" : "OFF");
		gpio_set_level(BLINK_GPIO, s_led_state);
		/* Toggle the LED state */
		s_led_state = !s_led_state;
		vTaskDelay(CONFIG_BLINK_PERIOD / portTICK_PERIOD_MS);

    }
}
This verifies that the IDE, compiler, and serial communication are working correctly.
10. Building the Project
Click the Build button or use: Project → Build Project

The IDE compiles:
- Source code
- Libraries
- Bootloader
- Firmware image
If successful, the console shows: Build Finished Successfully
11. Flashing the Firmware
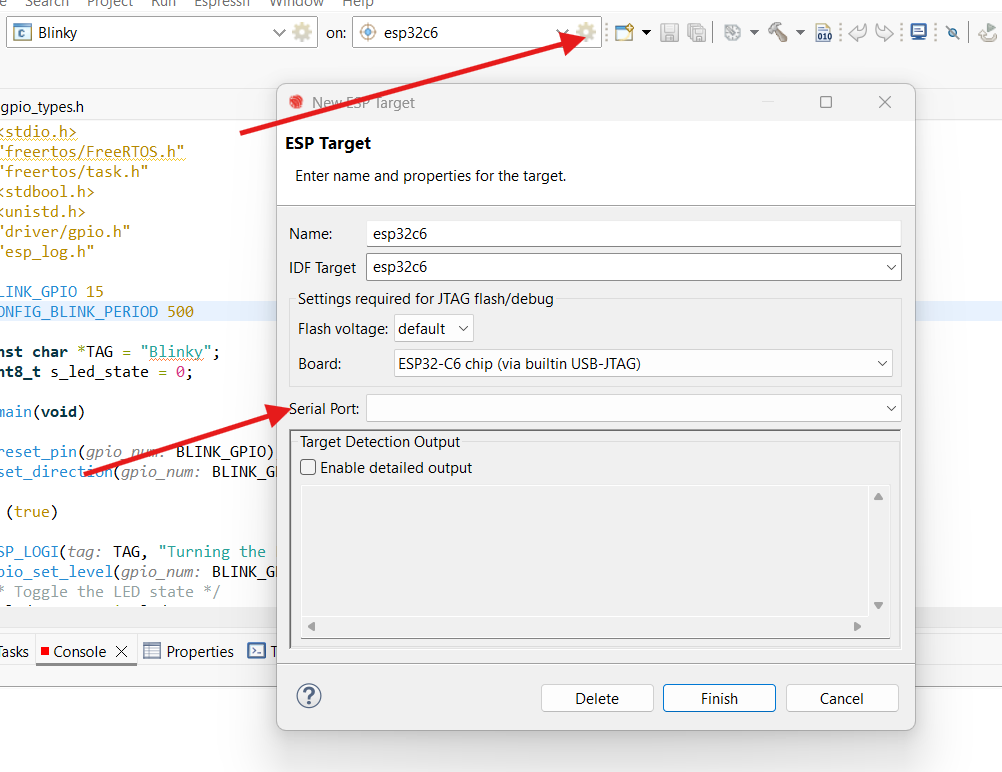
- Connect your ESP32 board via USB
- Select the correct serial port via clicking on gear symbol shown in image & select appropriate serial port
- Click Finish & click on Play button which will automatically program the board via USB
The IDE uploads the firmware to the ESP32’s flash memory. On completion, the console displays: Flash Complete
12. Monitoring Serial Output
Open the Serial Monitor to view runtime messages. Example output:
Hello ESP32
Hello ESP32
Hello ESP32
This confirms your application is running as expected.
Conclusion
The ESP32 has become one of the most versatile and cost-effective microcontroller platforms for IoT and embedded systems. With its powerful dual-core processor, integrated Wi-Fi and Bluetooth, rich peripheral interfaces, low-power operation, and built-in security features, it supports a broad range of applications from home automation to industrial monitoring.
The Espressif IDE, built around the ESP-IDF framework, provides a comprehensive development environment that simplifies every stage of the development lifecycle—from project creation and code editing to compiling, flashing, debugging, and serial monitoring.
By following the steps outlined in this guide, developers can quickly set up their development environment, create their first ESP32 project, and begin building connected embedded applications. As familiarity with the platform grows, developers can explore advanced features such as FreeRTOS task management, wireless communication protocols, secure firmware updates, cloud integration, and real-time sensor interfacing, unlocking the full potential of the ESP32 ecosystem.